Hi everyone! I am Sarakenobi, and as my handle suggests I am a pretty big geek. I am a huge fan of color and decorating with geeky concepts in mind. I also LOVE making things for my 2 boys -- ages 2 and 4, in hopes of corrupting them and turning them into the most giant nerdlings ever.
Today I am hoping to create my first tutorial.
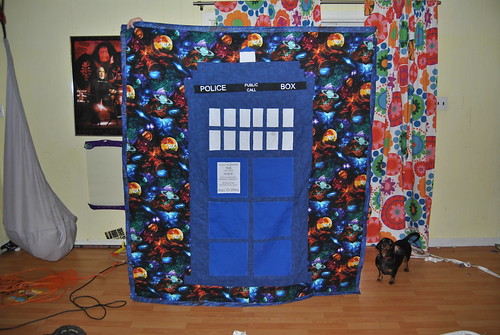
The TARDIS quilt.
Materials:
TARDIS BODY (navy blue on mine) - 1 1/2 yds
Lighter blue - boxes on body and triangle top of light - 1 yd
White - windows, sign, and light 1/2 yd
black for POLICE PUBLIC CALL BOX sign - 1/8 yd
Pellon Wonderunder - 3.5 yds
batting - I used a thin cotton one - 2 yds
white fabric paint
freezer paper
backing/fabric behind TARDIS - I bought 4 yds each and then cut to the size I wanted. I finished with a size of 60" x 70" Iron the WonderUnder to all the fabric except the white sign piece (the 6"x8" rectangle)
cut out all the fabric
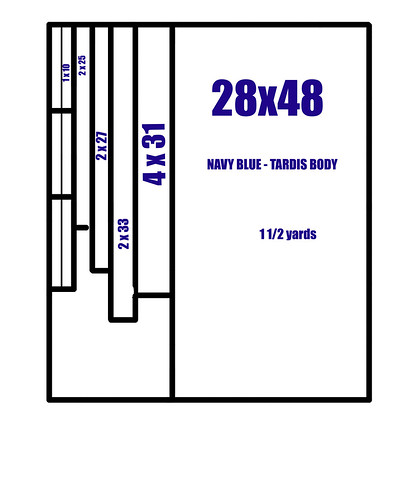
This is the most pieces - the TARDIS body, all lined up for you with a little extra leeway (I used a bedsheet so I had a lot of extra fabric....)
take your background fabric (in my case, the planets fabric.) I folded the fabric so I had 2 -2yd pieces and then sewed it together so it was wider (82 ish inches) and ironed the crease. Like this
Line up all the pieces of the TARDIS and start ironing!
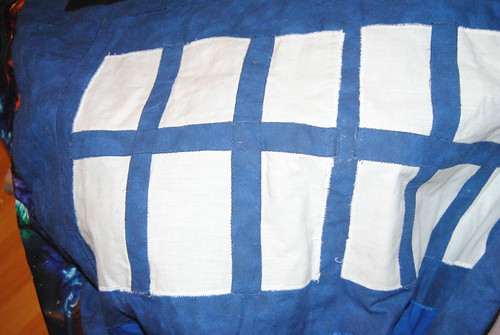
do it by layers - first the navy blue, then the lighter blue and the white.
leave off the black and the white sign! those are next!
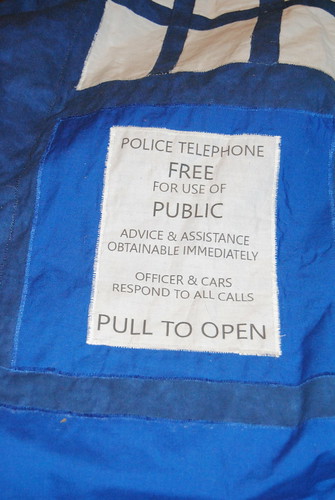
take your freezer paper and cut it down to computer paper size, and iron on the backside of the white. it's going to stabilize the white fabric so you can print directly on it.
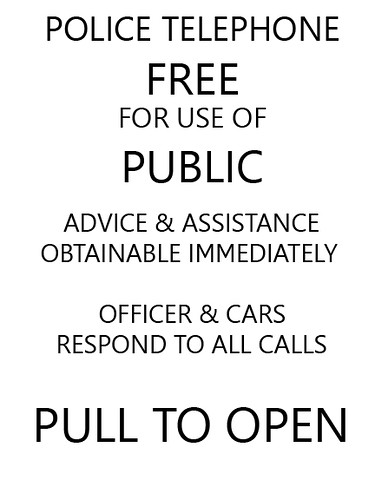
you should be able to save this and directly print it off. After you successfully print off the page, you can iron on the Wonderunder and then iron it onto the TARDIS with the rest of the pieces.
Make some Vworp Vworp Vworp noises because the hardest part is almost done!
Now you are going to do some freezer paper stenciling! Hopefully this will print out proper size for you:

I printed it off on computer paper and then traced it onto the freezer paper, used an E-xacto knife and cut the letters out. This is the stencil - the black parts are cut away and you are left with the white freezer paper. iron that onto the black fabric, spacing it how you want it. Follow the directions on the white fabric paint you've purchased and follow the directions on the bottle!
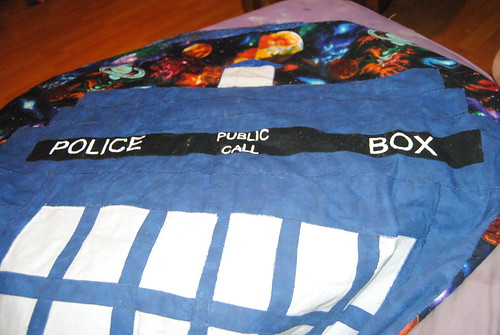
After the paint has set, iron the black bar onto the TARDIS. HOORAY NO MORE IRONING! Use a zigzag stitch to catch the edges of the fabric and outline the TARDIS. IT TAKES FOREVER.
Now do the same thing with the backing that you did with the planet fabric - fold in half, cut and sew together. I felt that it looked a little too square, so I trimmed about 5" off each side of the planet fabric and cut the interfacing to match. (1) Take the blue/gold fabric and cut it about 2" wider on all sides than the planets fabric. Then sandwich the fabrics together Top/interfacing/backing.
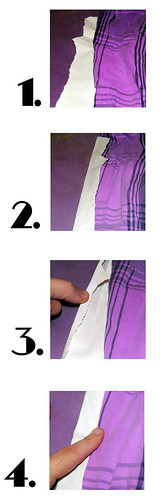
Next we do a faux-binding (the lazy man's way!) and are going to (2) fold the backing over the front of the top so there is about an inch of the blue/gold backing fabric over the space fabric. (3&4) Fold the edges of the faux binding in and pin. Topstitch over all the edges to bind the quilt, and then do whatever decorative stitching you want to do. I just stitched around all the planets.
PICTURE REFERENCE!
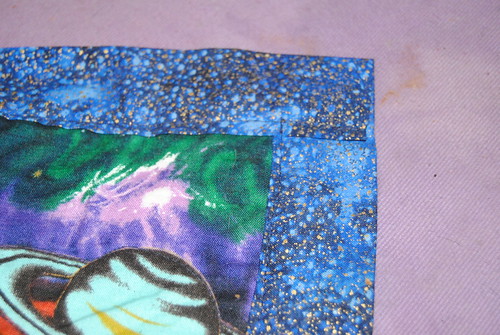
corners of the binding.
Grab your Sonic Screwdriver! you are finally done!